Fast-Track Tutorial
What You'll Learn
- How to create your first repository, test project and test module
- How to create and run your first test case (Web Testing)
- How to quickly review the test result
- How to create your first interface entity using POM Builder
- How to use interface entities to improve maintainability
- How to create a "user-scripted" action (or so-called "high-level" action)
- How to refactor your test module to work with the new "user-scripted" action
Create your own repository
- Open TestArchitect IDE
- Right click the root node on the Explorer tree (left panel) and select New Repository Connection
- Click New... on the Add Repository Connection dialog
- Type in
WebRepositoryas the new name for your repository then hit OK - Log into the newly created repository using the default username and password (
administrator/blank)
TIP
By default, a Repository Server instance will be installed on your local machine when you install TestArchitect. Therefore, localhost:53400 is always there for you to select. However, if you set up a remote Repository Server that can be shared with your team on a different machine, enter that machine's IP and the appropriate port into the Server field, e.g. 192.168.167.20:53400
Now you have a brand new repository of your own. To learn more about TestArchitect repositories, check out this article.
Create your first test project
- Right click on the
WebRepositoryrepository and select New Project - Fill in the name of your project, e.g.
Demo Shop - Fill in the 3-char abbreviation for your project, e.g.
DEM - Click Create
This project will be the central database to store all of your test assets later on.
Create a test module
- Right click on the Tests node of your project and select New Test Module
- Give the test module a name, e.g.
My First Test Module
My First Test Module test module will be our main test module of interest from now on.
Run your first test
- Copy this sample script and paste it into your test case
TC 01at line 15 ofMy First Test Module
| A | B | C | D | E |
|---|---|---|---|---|
| TEST MODULE | My First Test Module | |||
| setting | value | |||
| setting | use browser | Chrome | ||
| setting | webdriver mode | on | ||
| setting | escape sequences | yes | ||
| location | ||||
| navigate | https://demo.gondolatest.com | |||
| window | control | |||
| click | [doc title=LogiGear Demo Shop] | [ta class=button, xpath='//section[@class=\'content\']/div[1]/button[@class=\'add\']'] | ||
| click | [doc title=LogiGear Demo Shop] | [ta class=button, xpath='//section[@class=\'content\']/div[2]/button[@class=\'add\']'] | ||
| window | control | |||
| scroll to view | [doc title=LogiGear Demo Shop] | [ta class=div, xpath='//div[@class=\'cartcount\']'] | ||
| window | control | |||
| click | [doc title=LogiGear Demo Shop] | [ta class=div, xpath='//div[@class=\'cartcount\']'] | ||
| window | control | property | variable | |
| get control property | [doc title=LogiGear Demo Shop] | [ta class=strong, xpath='(//div[@class=\'carttext\']//strong)[1]'] | innertext | >> item1 |
| get control property | [doc title=LogiGear Demo Shop] | [ta class=strong, xpath='(//div[@class=\'carttext\']//strong)[2]'] | innertext | >> item2 |
| variable | value | |||
| set variable | total | # item1 + item2 | ||
| window | control | property | expected | |
| check control property | [doc title=LogiGear Demo Shop] | [ta class=h3, xpath='//div[@class=\'total\']//h3'] | innertext | # "Total: $" & total |
- Click the Execute button on TestArchitect IDE's toolbar then click Execute on the Execution dialog
- Kick back and watch the test running
At this point, you should be able to watch TestArchitect automating the Demo Shop sample app (Web) at https://demo.gondolatest.com. The test makes sure that the total payment of the cart after adding 2 items is calculated correctly.
Review the result
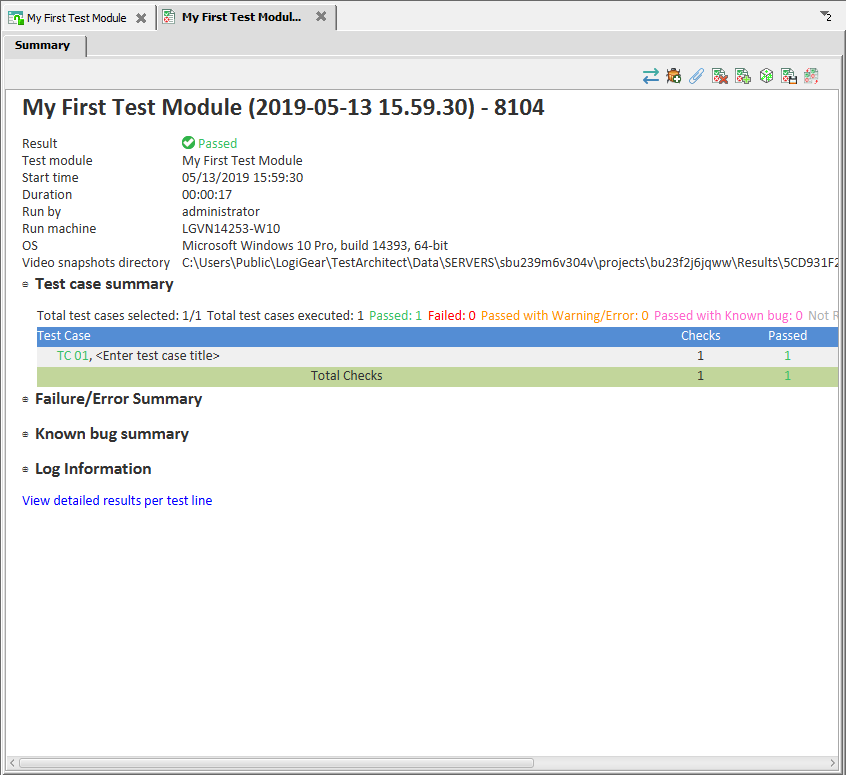
- After the test execution finishes, a new Test Result tab will be opened automatically on TestArchitect IDE. You'll notice that the summary table contains several pieces of usual information such as number of test cases, passed, failed, total checks, etc.
- Click on the View detailed results per test line hyperlink to open the detailed result on your default browser. In this detailed result, you'll be able to investigate each and every result line along with the screenshots attached to them.
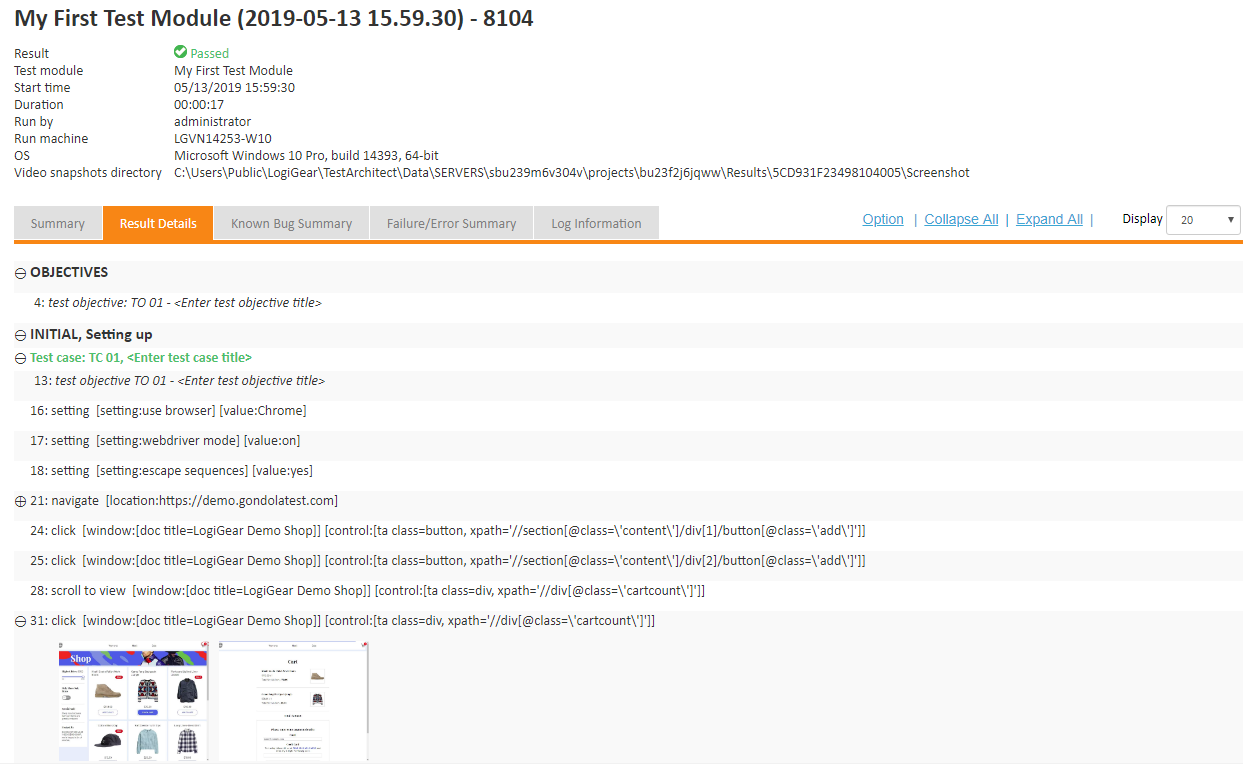
Feel free to explore this detailed test result to understand more about the test flow and our verification point.
More fun with "Interface Entity"
As you skim through the test script and test result, you'd probably notice some strange-looking strings such as [ta class=h3, xpath='//div[@class=\'total\']//h3']. These are called dynamic identifiers. A dynamic identifier tells TestArchitect how to look for a UI element on screen. Albeit convenient, these identifiers are not ideal for the long-term maintainability of your tests. To increase maintainability, let's convert these dynamic identifiers into a more reliable form, called "interface entities".
- Expand the Interfaces node on the Explorer tree and click New Interface Entity... to create a new entity named
Home Pageunder the default interfaceDemo Shop
- To locate the web app under test, paste the below interface entity setting into your
Home Pageentity
| A | B | C |
|---|---|---|
| INTERFACE ENTITY | Home Page | |
| setting | value | |
| interface entity setting | doc title | LogiGear Demo Shop |
- Install the POM Builder extension
Why Installing POM Builder? And What Is It?
In parallel to TestArchitect Interface Viewer, we've created a free Chrome extension to help you quickly capture the locators of your web elements called POM Builder. You can cut down element locating time significantly using its intelligent auto-suggestion algorithm. Download it for free on Chrome Web Store here
- After installing the POM Builder extension, open Chrome and navigate to https://demo.gondolatest.com
- Right click on the ADD TO CART button of the first shopping item and select Inspect. You'll notice that the Chrome DevTools (F12) tool is opened
- Select the POM Builder tab
- Select
TestArchitectas your OUTPUT FORMAT - Click the Copy button of the recommended locator and the following XPath value is copied to your clipboard:
//section[@class='content']/div[1]/button[@class='add']
- Paste the XPath locator from your clipboard into the interface entity
Home Pageand name the new interface element asadd to cart 1
- You can repeat this process again and again for the rest of the web elements (
add to cart 2button,cart countbutton,item 1,item 2, andtotal). However, to save you some time, feel free to copy and paste the table below into yourHome Pageinterface entity (overriding current values).
| A | B | C | D |
|---|---|---|---|
| INTERFACE ENTITY | Home Page | ||
| setting | value | ||
| interface entity setting | doc title | LogiGear Demo Shop | |
| ta name | ta class | xpath | |
| interface element | add to cart 1 | button | //section[@class='content']/div[1]/button[@class='add'] |
| interface element | add to cart 2 | button | //section[@class='content']/div[2]/button[@class='add'] |
| interface element | cart count | div | //div[@class='cartcount'] |
| interface element | item1 | strong | (//div[@class='carttext']//strong)[1] |
| interface element | item2 | strong | (//div[@class='carttext']//strong)[2] |
| interface element | total | h3 | //div[@class='total']//h3 |
- Switch back to your test module and replace the dynamic identifiers with the interface entity's name (
Home Page) and its elements (add to cart 1,add to cart 2,cart countand so on). The end result should look like the below.
| A | B | C | D | E |
|---|---|---|---|---|
| TEST MODULE | My First Test Module | |||
| setting | value | |||
| setting | use browser | Chrome | ||
| setting | webdriver mode | on | ||
| setting | escape sequences | yes | ||
| location | ||||
| navigate | https://demo.gondolatest.com | |||
| window | control | |||
| click | Home Page | add to cart 1 | ||
| click | Home Page | add to cart 2 | ||
| window | control | |||
| scroll to view | Home Page | cart count | ||
| window | control | |||
| click | Home Page | cart count | ||
| window | control | property | variable | |
| get control property | Home Page | item1 | innertext | >> item1 |
| get control property | Home Page | item2 | innertext | >> item2 |
| variable | value | |||
| set variable | total | # item1 + item2 | ||
| window | control | property | expected | |
| check control property | Home Page | total | innertext | # "Total: $" & total |
- (Optional) Rerun the test to make sure that it works normally just like it previously did.
After getting rid of those fragile dynamic identifiers, you're now left with a more stable script. Let's say the GUI of this Home Page screen changes. With an Interface Entity in place, you don't need to modify the Test Module (My First Test Module). Instead, you just need to modify the specific control (e.g. add to cart 1 button) inside the Interface Entity (Home Page) and the test will be up and running again.
It's time for some "Action"
Action is one of the key concepts in Action-Based Testing. Actions are the building blocks that make up a test case. So far you've seen plenty of built-in actions like navigate, click, scroll to view, setting, get control property and check control property. These actions automatically work as you would expect because the automation code has been implemented out-of-the-box. That said, you can also build your own "user-scripted" actions (or some might call "high-level").
In ABT, you combine built-in actions and other user-scripted actions to form a new user-scripted action to increase reusability and maintainability of your tests. Let's create a user-scripted action named buy product.
- Right click on the Actions node (Explorer tree) and select New Action...
- Name the new action as
buy product - Copy-paste the following script into the body of the new action
| A | B | C | D | E |
|---|---|---|---|---|
| ACTION DEFINITION | buy product | |||
| name | default value | description | type | |
| argument | window | Interface Entity | ||
| argument | product name | String | ||
| argument | product price | String | ||
| variable | value | |||
| set variable | add to cart button | # "//p[.=\\'" & product name & "\\']/parent::div[@class=\\'item\\']/button" | ||
| window | control | |||
| click | # window | # "[ta class=button, xpath=\'" & add to cart button & "\']" | ||
| variable | value | |||
| set variable | price tag | # "//p[.=\\'" & product name & "\\']/parent::div[@class=\\'item\\']/p[2]" | ||
| window | control | property | variable | |
| get control property | # window | # "[ta class=paragraph, xpath=\'" & price tag & "\']" | innertext | # product price |
- Now we need to refactor our test module
My First Test Moduleto work with the newly created actionbuy product. Paste the below script intoMy First Test Module(overriding existing values).
| A | B | C | D | E |
|---|---|---|---|---|
| TEST MODULE | My First Test Module | |||
| setting | value | |||
| setting | use browser | Chrome | ||
| setting | webdriver mode | on | ||
| setting | escape sequences | yes | ||
| location | ||||
| navigate | https://demo.gondolatest.com | |||
| window | product name | product price | ||
| buy product | Home Page | Khaki Suede Polish Work Boots | item1 | |
| buy product | Home Page | Camo Fang Backpack Jungle | item2 | |
| window | control | |||
| scroll to view | Home Page | cart count | ||
| window | control | |||
| click | Home Page | cart count | ||
| variable | value | |||
| set variable | total payment | # right(item1, length(item1)-1) + right(item2, length(item2)-1) | ||
| window | control | property | expected | |
| check control property | Home Page | total | innertext | # "Total: $" & total payment |
- (Optional) Rerun the test to make sure it works correctly.
The buy product action you've just created does what it says: buys a product with a specific name and returns the price of that product. Actions like buy product can be used any where. The more you reuse it, the more you increase productivity. On top of that, you also increase maintainability. Let's say there are some changes to the product buying flow, you just need to modify buy product action to accommodate the changes. The test module My First Test Module is kept intact.
Minor tweaks before we finish
Move setting actions to INITIAL section
Usually test cases in the same test module share the same pre-conditions test steps. In Action-Based Testing, those pre-conditions steps are stored in the INITIAL section. As you have already know, we must specify the automation settings for our run using setting actions before we could launch the browser and proceed to the follow-up test steps. Thus, let's put these setting actions back to where they belong: the INITIAL section.
Add test objectives and test case description
While you're at it, also take some time to input the test objective at line 4 and test case's title at line 14 to communicate your testing goals to your teammates. Below is the tweaked test case.
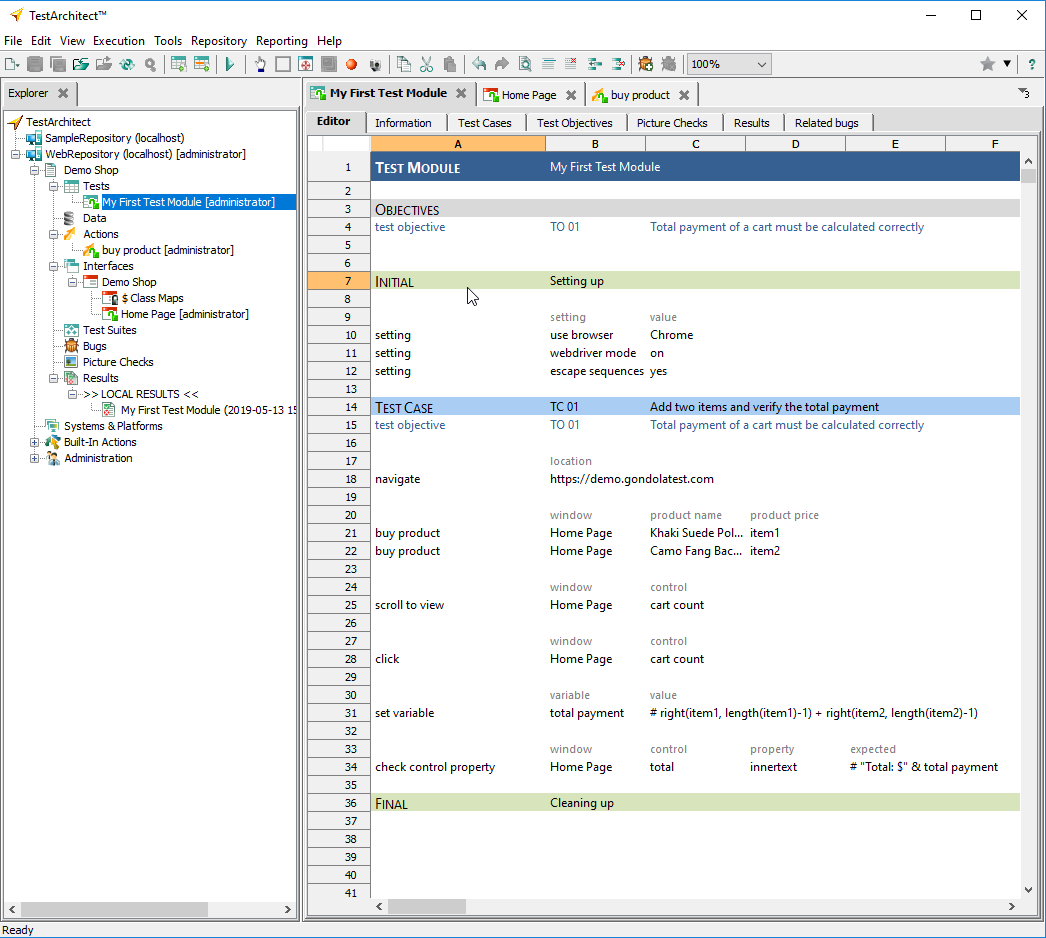
Finally, let's rerun the test module.
Congratulations! You've finished the Fast-Track Tutorial. Hopefully, you've grasped the basics of TestArchitect and Action-Based Testing. Start applying what you have learned so far to automate your apps. If you encounter any troubles or you found mistakes in this guide, drop us an email at support@logigear.com.
TIP
- To learn more about the Test Module format in Action-Based Testing, check this article out.
- Check this blog post out to learn more about Keyword-Driven Testing Best Practices.